

- 1. 3D Modeling: How to Avoid Mistakes
- 2. Mistake #1 – Not Meeting Material Requirements
- 3. Mistake #2 – Not Following Printing Technology
- 4. Mistake #3 – Not Meeting Wall Thickness Requirements
- 5. Mistake #4 – Not Meeting File Resolution Requirements
- 6. Mistake #5 – Not Following Software Guidelines
3D Modeling: How to Avoid Mistakes
We know that modeling for 3D printing is not an easy task. In 3D modeling, just like in 3D printing, there is no one-size-fits-all solution. We all have different software, print with different materials, and not only use different printers but also printing technologies. Therefore, it's completely normal that you may not be able to create the perfect 3D model for 3D printing on the first try. That's why we've listed 5 mistakes to avoid when developing a model.
Mistake #1 – Not Meeting Material Requirements
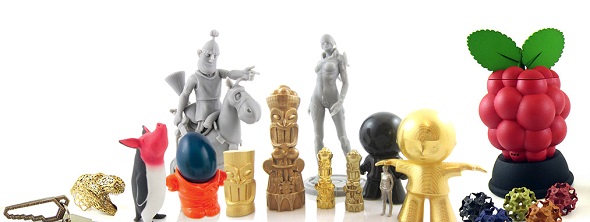
All printing materials differ from each other. A material can be fragile or strong, flexible or rigid, smooth or rough, heavy or light, and so on. Ideally, the object should be designed for a specific material. For example, if you know that the 3D model will be printed from ceramics, you need to adhere to specific design recommendations for this material (such as supporting overhanging parts, reinforcing protruding elements, smoothing corners, and so on). The choice of printing materials predetermines some of the basic design principles you need to consider.
Each 3D printing material has its own characteristics. Be sure to read the design guide for the material you choose.
Solution: Adhering to design rules for a specific material is crucial for successful printing. Ideally, you should read the design guide before starting work on your model.
Mistake #2 – Not Following Printing Technology
Not only do the basic chemical characteristics of printing materials differ, but also the technologies used to print each of these materials.
For example, interlocking parts can be printed using materials like ABS, polyamide, or alumide, while it's impossible with other materials like gold, silver, bronze, or resin. The reason lies not in the material itself but in the technology used for printing each of them.
For ABS, we use fused filament fabrication (based on filaments) with additional nozzles and support materials; for polyamide, alumide, and rubber-like material, we use selective laser sintering (based on powder); for precious metals — investment casting, and for resin — stereolithography (based on liquid polymer).

There are many different technologies for 3D printing. The image shows the "Mammoth" printer from Materialise, working with stereolithography technology.
This may sound strange, but you should remember the following: we cannot assume that stainless steel and silver will have similar requirements just because both materials are metals. They are printed using different technologies, and therefore some design features will differ. However, materials that use the same technology, such as gold, silver, bronze, copper (investment casting), are likely to have similar design requirements.
Solution: Before starting the design, you need to learn all the characteristics of the materials. Also, keep in mind that the maximum print sizes differ depending on the use of different printers and printing technologies.
Mistake #3 – Not Meeting Wall Thickness Requirements
Even if information about wall thickness is available in the guide mentioned above, it is worth emphasizing the importance of this point again.
Problems related to wall thickness are currently the most common reasons why some 3D models do not print properly. In some cases, the walls are too thin. This prevents the model parts from printing, or they turn out very fragile and can easily break. On the other hand, too thick walls generate a lot of internal stress and can lead to cracks or even breakage.
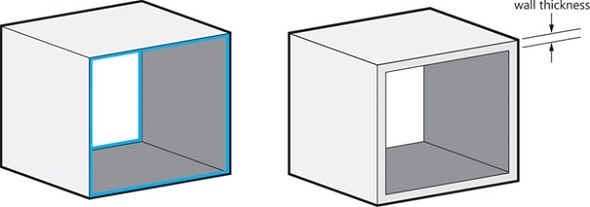
Correct wall thickness is crucial for successful printing.
Solution: First, read the information on how to achieve the ideal wall thickness for a 3D model. Then proceed to the design guide for the material you have chosen and follow all the instructions.
Mistake #4 – Not Meeting File Resolution Requirements
Have you read the design guide? Do you know your material? Is the wall thickness okay? Great, now there's one more thing to pay attention to: file resolution.
For 3D printing, the most common file format is STL (Standard Triangle Language). This means that the mathematical language in which your 3D design is written must be translated into a simpler language that your 3D printer can understand. Most 3D modeling software has an option to export your design to an STL file and choose the desired resolution. Here's a visual representation of different file resolutions — from extremely high (left) to quite low (right):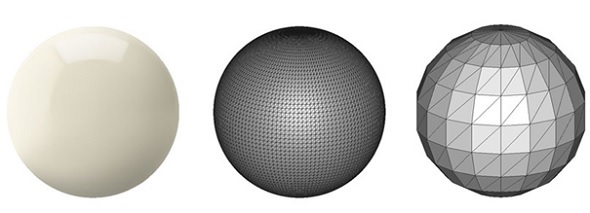
Choosing the right resolution for your file ensures good print quality. Too low or too high a resolution can cause the following problems:
STL file with low resolution: it's important to know that low-quality export will not ensure good printing. Low resolution means that the triangles in your STL file are large, and the print surface will not be smooth. This will result in a somewhat "uneven" print.
STL file with very high resolution: a file with such resolution is too large, so sometimes it cannot be printed. It may also contain an extreme level of detail that 3D printers simply cannot reproduce. When uploading to a printing site, we recommend choosing a file size of up to 100 MB.
Solution: Most 3D modeling software offers to determine sensitivity when exporting a file. Sensitivity represents the maximum distance between the original shape and the STL mesh during export. We recommend choosing 0.01 mm. Exporting with a sensitivity of less than 0.01 mm makes no sense because 3D printers cannot print at this level of detail. Exporting with a sensitivity greater than 0.01 mm may show triangles during 3D printing.
Mistake #5 – Not Following Software Guidelines
3D modeling. Some of them were designed for creating 3D prints, while others are mainly used by 3D artists, and their projects require additional editing. For example, wall thickness in some programs is determined automatically, while in others it needs to be set manually.
Even if you are using beginner software designed exclusively for 3D printing (such as Tinkercad), creating a hollow model can be challenging. In this case, Meshmixer software can help you.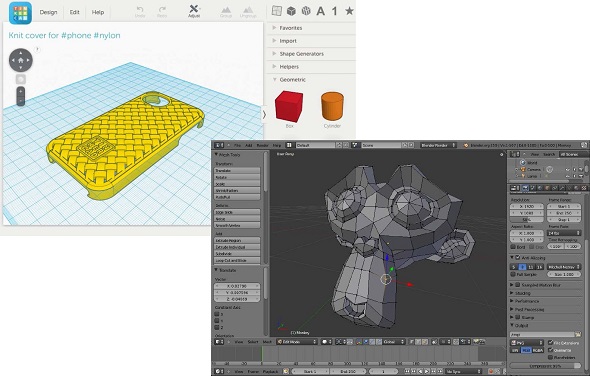
Different software, different file preparation procedures: Tinkercad (left) and Blender (right).
If you are using software like Blender (used for 3D graphics and animation), SketchUp (popular among architects and scale modelers), or ZBrush (used by 3D artists), further file preparation will be required. For example, depending on the software you use, you may need to make the object watertight, specify wall thickness, or set print dimensions. Again: each software has its differences.
Solution: Read the software guide for turning your model into a 3D print. If you can't find it on the official software websites, Google is your friend.
When choosing a program for 3D modeling, you can use the information from this article. If you're not sure you can create a 3D model, order 3D modeling from us. And after you've made (received, downloaded) the 3D model you wanted, print it yourself or order printing from us.


 MonoFilament 1.75 mm 0.75 kg Black")
 MonoFilament 1.75 mm 0.75 kg Black")


Leave a Comment