

Ювелірні випалювані фотополімери для лиття ювелірних виробів через 3D-друковані моделі
Ювелірні випалювані фотополімери увійшли в технологічний цикл виробництва ювелірних виробів порівняно недавно. Однак, до безперечних плюсів виготовлення 3D-друкованих моделей ювелірних прикрас відноситься швидкість їх відтворення і копіювання, яка не впливає на їх філігранну точність і наповненість. Використання лазерного 3D друку на 3D принтерах компанії Formlabs і спеціально розроблених 100% випалюваних смол, таких як Castable Wax Resin, Castable Wax 40 і Castable Resin удосконалює процес виготовлення ювелірних прикрас.
При литті по виплавлюваних моделях порожниста форма створюється з майстер-шаблону, створеного вручну або надрукованого на 3D-принтері, використовуючи ювелірні випалювані фотополімери.
Майстер-шаблон занурюється у вогнетривкий ливарний матеріал (або «формувальну масу»), який сохне і твердне. Віск або модель, надрукована на 3D-принтері, вигоряє, залишаючи у гіпсі негативний відбиток дизайну. У цю порожнину заливається метал, і після його застигання виходить фінальна деталь.
Воскові викрійки для хитромудрих прикрас складно виготовити вручну, і в світі, де панує високий попит і швидка мода, виробам ручної роботи може бути важко встигати за ними. Сучасні матеріали і доступні 3D-принтери, такі як Form 3, змінюють методи роботи виробників і дизайнерів ювелірних виробів, привносячи промислову якість на робочий стіл і спрощуючи виробництво і підгонку складних геометричних фігур, які колись вимагали багатогодинної копіткої праці.
1. Дизайн для лиття
Використовуйте програмне забезпечення CAD, таке як RhinoGold, JewelCAD або 3Design, щоб перетворити ваші моделі з концепції на 3D-друкований зразок, використовуючи ці передові методи.
Дизайн традиційних воскових моделей і 3D-друкованих моделей з смоли враховує багато принципів. Наприклад такі як важливість плавного руху матеріалу. По можливості уникайте створення гострих кутів, які можуть посилити турбулентність. Як і у випадку з воском, зорієнтуйте дизайн так, щоб він заповнював великі пустоти і менші канали та деталі.
Литники
У той час як великі живильні литники можна створити зі звичайного воску, маленькі литнікові канали можна надрукувати на 3D-принтері, щоб заощадити трудовитрати і поліпшити заповнення форми до дрібних деталей. Подавальні литники повинні бути прямими або такими, що звужуються до виробу.
Опори, додані в PreForm, не слід використовувати в якості литників. Якщо ви збираєтеся друкувати литники на 3D-принтері, ми рекомендуємо включити їх в ваш проект CAD.
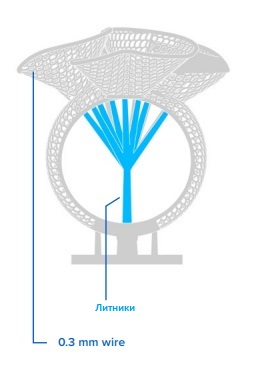
Філігрань
Виняткова деталізація Castable Wax Resin дозволяє створювати вироби з хитромудрою філігранню. Ці тонкі дротяні сітки виглядають складними, але їх можна відлити, застосувавши ретельно розроблену конструкцію литників.
Для друку дрібних сіток можна використовувати дріт діаметром від 0,3 мм. Друкована філігрань тендітна і легко пошкоджується при знятті опори. Створюйте філігранні деталі, щоб вони були максимально самопідтримувані. Литники, надруковані на 3D-принтері, можуть служити подвійним призначенням, – вони можуть бути опорами, які знімаються після лиття.
Щоб уникнути замерзання металу в цих тонких каналах, додайте литники, які подають метал в багато точок обода філігранної сітки.
Великі деталі
Formlabs Castable Wax Resin підходить для друку та лиття великих ювелірних виробів і інших литих деталей. Перетворіть вашу конструкцію на тонкостінну оболонку, щоб мінімізувати сили розширення формувальної маси під час вигоряння. Для деталей товщиною понад 4 мм слід додати дренажні отвори, щоб смола могла вимиватися з внутрішньої порожнини. Незастигла смола не вигорить чисто, що призведе до дефектів золи.
Formlabs рекомендує використовувати стінки завтовшки 0,7 мм для порожніх корпусів, надрукованих за допомогою Castable Wax Resin. Всередині можна також додати ґратчасту структуру для підвищення міцності при роботі з великогабаритними деталями.

2. Друк і підготування деталі до відливу
Заготовки прикрас можна роздрукувати великими партіями на настільному 3D-принтері Form 3. Компонування платформи збірки деталями забезпечує максимальну ефективність і продуктивність 3Д друку. Після друку в бажаній орієнтації виконайте наступні дії, щоб підготувати заготовки для литників і формування.
Миття
Це ретельне промивання деталей в 90% розчині ізопропілового спирту (IPA). Вкрай важлива операція для отримання чистої виливки. Надлишок незатверділої смоли може перешкодити ствердженню по виплавлюваних моделях і викликати дефекти лиття, такі як точкова корозія.
Дайте деталям повністю висохнути після їх вилучення з ванни IPA. Використовуйте стиснене повітря, щоб повністю випарувати весь IPA перед наступним затвердінням і заливкою. Якщо деталі Castable Wax все ще липкі після миття і сушіння, можливо, вам доведеться замінити IPA.
Примітка: не залишайте деталі в IPA довше, ніж необхідно. Мийка Form Wash автоматично піднімає деталі з IPA, щоб уникнути випадкового перемивання і деформації.
Сушіння
Полімерна структура деталі зі смоли повинна бути ретельно скріплена випромінюванням з довжиною хвилі 405 нм, щоб полегшити повне вигорання. Смоли Formlabs тверднуть в різному ступені на принтері Form 3, а для деяких з них потрібна стадія пост-затвердіння, якщо вони повинні бути відлиті по виплавлюваних моделях.
Castable Wax Resin не вимагає додаткового затвердіння і забезпечує підвищену ефективність лиття. Деталі з Castable Wax після затвердіння можуть викликати невелику (<1%) усадку.
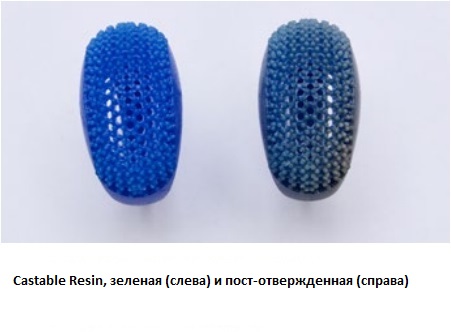
Опромінюйте деталі, надруковані з Castable Resin, до тих пір, поки поверхня не стане твердою і жорсткою. Обертання деталей в сушарці забезпечує рівномірне затвердіння. Сушарка Form Cure буде автоматично обертати деталі, але при використанні іншого методу може знадобитися ручне повертання деталі під час пост-затвердіння. Деталі з Castable Resin змінять свій колір з яскраво-синього на темний, матово-синій під час пост-затвердіння.
| Castable Wax Resin | Castable Resin | |
| Мийка Form Wash | 10 хв | 10 хв |
| Cleaning Kit | 10 хв + 5 хв (друге миття в чистому IPA) | 10 хв + 5 хв (друге миття в чистому IPA) |
| Сушарка Form Cure | Не потрібне | 4 години при 60 °C |
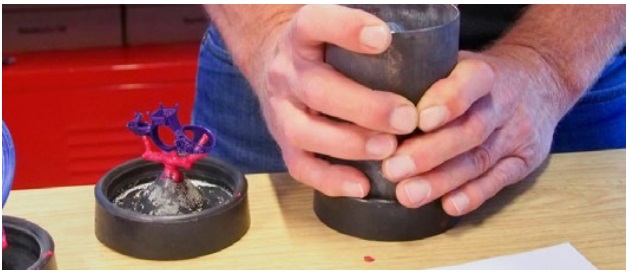
3. Побудова “Литникового дерева”
Прикріпіть відбитки після пост-обробки до основного воскового литника за допомогою липкого воску. Розплавте віск, щоб створити гладкі приєднання між кожним надрукованим малюнком і його подаючим литником.
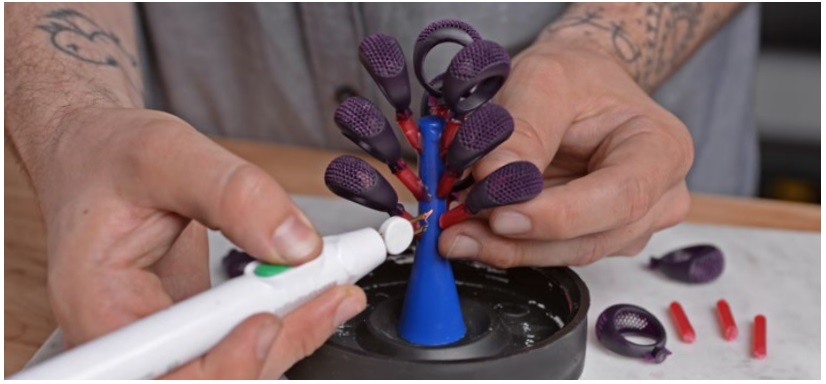
Розташуйте більш товсті частини знизу, а більш тонкі – вгорі дерева. Для 3D-друкованих деталей може знадобитися трохи більше простору між деталями, ніж для традиційного воскового дерева. Якщо ви відливаєте великі деталі з «тонкою оболонкою», обов’язково заповніть всі зливні отвори воском, щоб запобігти потраплянню формувальної маси на друк.
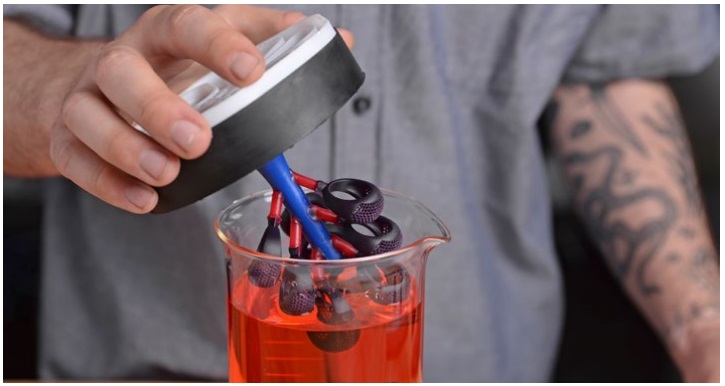
Поверхнево-активне покриття
Дуже поширений дефект виливки, викликаний бульбашками, які застрягли навколо моделі при заливці форми. Недорогі поверхнево-активні покриття або «дебубблайзери», такі як Wax Wash, допомагають запобігти прилипання бульбашок до відбитків. Покриття з поверхнево-активної речовини особливо корисне при литті філігранних моделей, які схильні до уловлювання бульбашок.
Formlabs рекомендує занурити дерево з моделями в розчин дебубблайзера і дати йому повністю висохнути перед заливкою формувальної маси.
4. Підготування форми
Наступні кроки є стандартною процедурою для підготовки будь-якої формувальної колби.
Вакуумна формувальна машина допомагає легко, чисто і рівномірно перемішувати, дегазувати і виливати пакувальну масу. Однак також можна використовувати окремий змішувач і вакуумну камеру.
1.Приєднайте до основи ливника колбу для лиття. Якщо колба має перфорацію, оберніть її прозорою пакувальною стрічкою, щоб запобігти витіканню формувальної маси.
2. Змішайте формувальний порошок і холодну дистильовану воду відповідно до інструкцій виробника. Додавання трохи меншої кількості води в суміш зазвичай збільшує міцність формувальної маси, хоча в’язкість також збільшується (і тоді її важче дегазувати). Перемішуйте на повільній швидкості, поки порошок не стане повністю вологим.
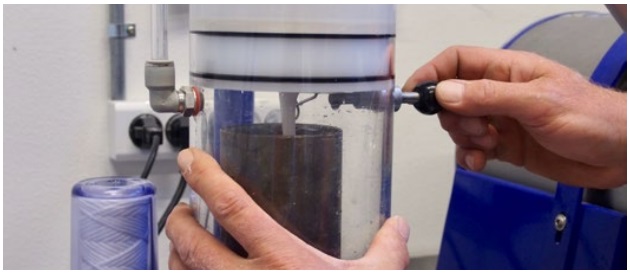
3. Повільно вилийте формувальну масу по стінці колби, уникаючи дерева з моделями. В разі плавної заливки, бульбашки не затримуються. Використовуйте вакуумну камеру для видалення бульбашок з колби. Дайте формуванню затвердіти і висохнути.

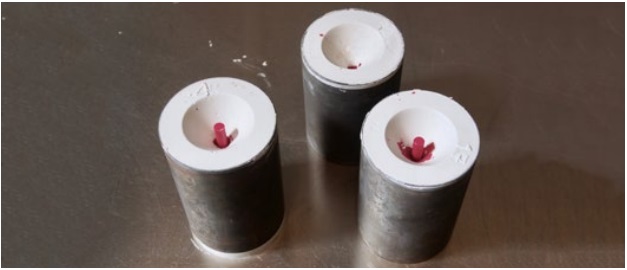
4. Обережно зніміть гумову основу ливника з колби і дайте йому застигнути в середовищі без вібрації протягом 2-6 годин. Дотримуйтесь рекомендацій виробника формувальної маси з безпеки. Ми рекомендуємо використовувати респіратор.
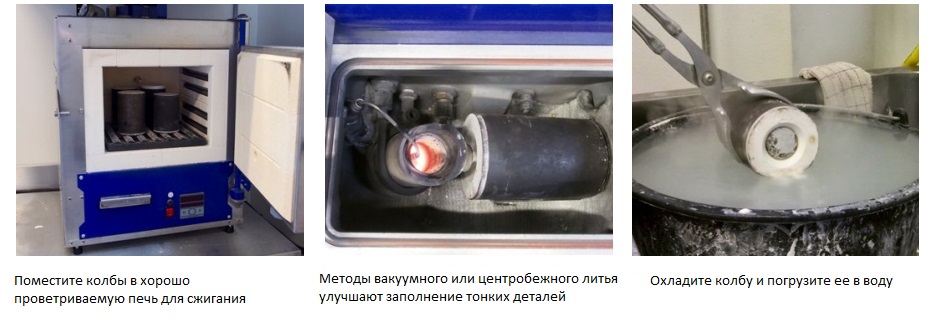
5. Вигорання і лиття
Помістіть колбу в піч для вигоряння і нагрійте, використовуючи рекомендований графік вигоряння. Внесіть зміни в залежності від інструкції по формуванню, розміру колби і кількості друкованого матеріалу.
Якщо ви починаєте вигоряння в гарячій печі, переконайтеся, що колби відпочивають не менше 5 годин, інакше формувальна маса може тріснути, коли вода розшириться і перетвориться на пару.
Formlabs рекомендує використовувати піч з хорошою вентиляцією (з входом і виходом), щоб забезпечити достатній повітряний потік по всій камері і безпечно видалити весь випаруваний полімерний матеріал.
Коротке вигорання
Смола Castable Wax Resin на 20% заповнена воском, що дозволяє друкованим зразкам частково руйнуватися на більш ранньому етапі циклу вигоряння, забезпечуючи більш швидкий час вигоряння для моделей Castable Wax.
Короткочасне вигоряння обмежене певною геометрією і більш дорогими пакувальними матеріалами, такими як Ultravest Maxx від R & R. Подробиці див. в Керівництві по використанню Castable Wax.
Примітки:
• Вентиляція необхідна, але це може призвести до падіння температури в духовці. Слідкуйте за температурою духової шафи і колби або змінюйте свій процес у міру розробки графіка вигоряння, що підходить для вашого власного обладнання.
• При використанні активної вентиляції максимально збільште приплив повітря, щоб поліпшити циркуляцію повітря в духовці.
• Якщо духовка повна, вигоряння на колбу буде менш ефективним. Приєднайте до духовки кисневий генератор, щоб збільшити приплив повітря.
Лиття
Вийняти форму з печі і відлити метал. Відцентрові або вакуумні ливарні машини, такі як Neutec J2R (США) і Indutherm серії MC (ЄС), прості у використанні і добре керовані. Після заливки ретельно охолодіть форму у воді і змийте формувальну масу.
Сумісність дорогоцінних металів
Formlabs протестував золоті, срібні та бронзові виливки з моделей Castable Wax. Сумісність металів – це, перш за все, властивість формувальних мас. Різні метали вимагають різного ступеня термостойкости від формувальної маси. Для повного вигоряння Castable Wax, потрібна температура не менше 732 ° C. Запитайте виробника, якщо ви маєте сумніви щодо сумісності малюнка смоли з конкретними формувальники.
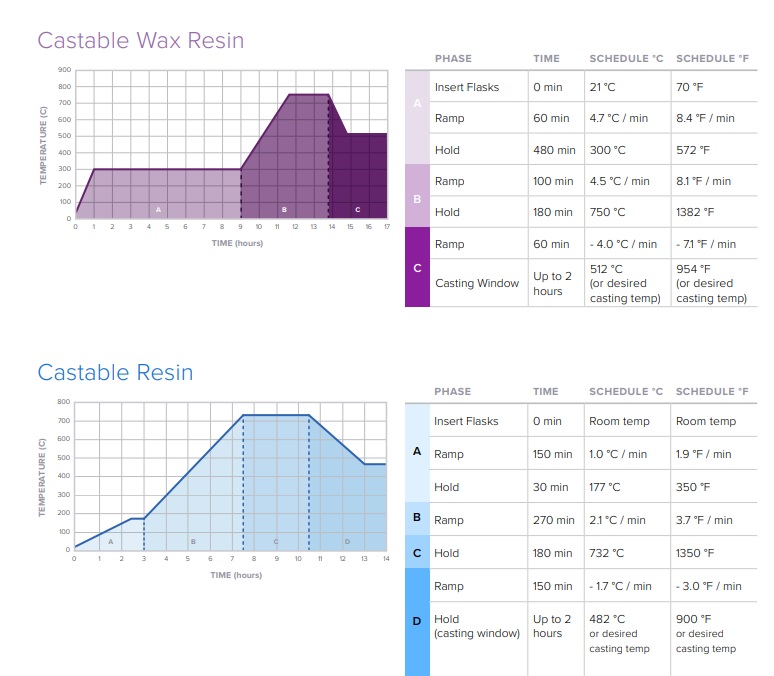
Графік вигоряння фотополімерів
Formlabs пропонує Castable Wax і Castable Resin для лиття по виплавлюваних моделях ювелірних виробів. Castable Wax Resin покликаний забезпечити підвищену гнучкість графіка вигоряння, і при використанні Castable Wax ливарники повинні в першу чергу дотримуватися інструкцій виробника для їх формувальної маси. Castable Resin – це продукт попереднього покоління, що вимагає більш точного і щадного режиму вигоряння.
Нижче наведені рекомендовані графіки для кожного матеріалу для використання з R&R Plasticast з формувальною масою BANDUST.
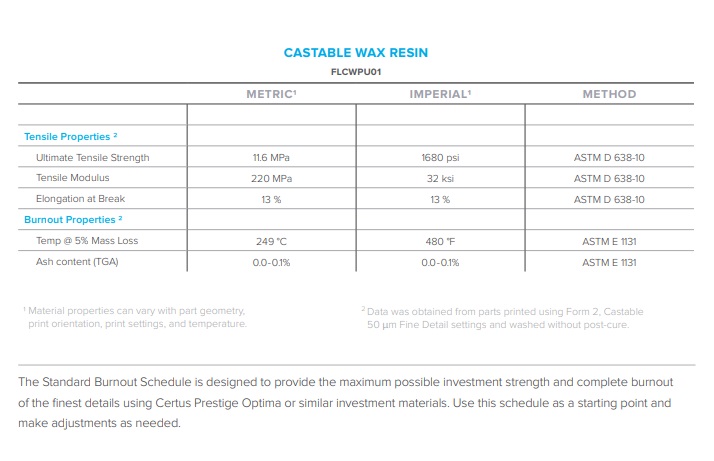
Ювелірні випалювані фотополімери: Castable Wax Resin, технічні властивості:
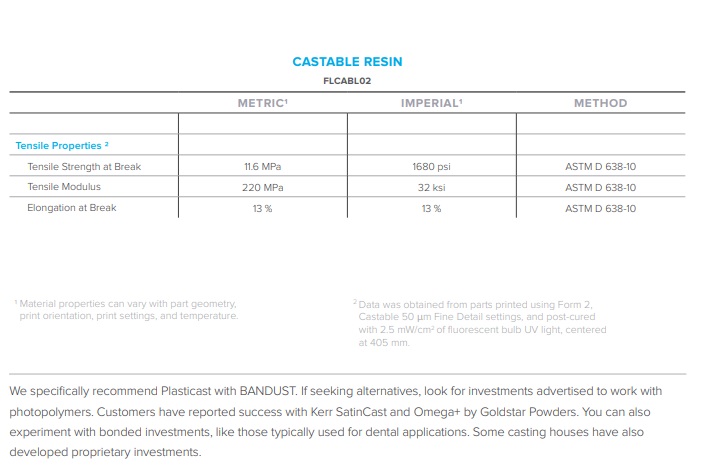
Ювелірні випалювані фотополімери: Castable Resin, технічні властивості:
Контрольний перелік усунення недоліків:
| Проблема | Причина | Рішення |
| Маленькі пухирці під час лиття | Формувальна маса занадто в’язка | Збільшити кількість води, доданої до формувального порошку |
| Час роботи формувальної маси занадто малий для повної дегазації колби | Використовуйте в суміші холодну воду | |
| Бульбашки в пастці проти візерунка | Використовуйте покриття з поверхнево-активною речовиною (дебабблізатор) | |
| Металічні бліки або зубчасті каплі під час відливання | Формувальна маса занадто слабка і тріснула або пошкоджена під час перегоряння | Зменшити кількість води, що додається до формування |
| Збільшити час установки стенду після формування | ||
| Збільшити відстань між деталями зі смоли | ||
| Потрібна більш повільна швидкість вигоряння | ||
| Пориста поверхня на відливці | Усадка металу при охолодженні без запасу розплавленого металу для витяжки | Додати резервуари до литникового дерева |
| Часткова заливка на тонких частинах або по філіграні | Заморожування металу в формі | Встановити додаткові литники |
| Збільшити температуру лиття | ||
| Ямчаста поверхня | Залишок золи, що залишився від непоного вигоряння | Збільшити час при максимальній температурі вигоряння |
| Збільшити потік повітря в печі вигоряння | ||
| Перед заливанням відкачати повітря з колби |
Ювелірні випалювані фотополімери. Відео по темі.
Мистецтво лиття зі смол, надрукованих на 3D-принтері. Технології змінюють цю традиційну галузь:
Такої досконалості ювелірного виробу неможливо було б досягти без 3D-друку:
Дивіться також інші статті про застосування 3D технологій в ювелірній справі.


Залишити коментар