

3D принтер MakerWare! MakerWare – ідеальне програмне забезпечення для керування настільними 3D-принтерами Replicator і Replicator 2X. MakerWare версії 2.3 отримав розширені можливості, які зроблять процес 3D-друку ще простішим і приємнішим. У новому MakerWare 2.3 повністю оновлено процес керування подвійною екструзією.
3D принтер MakerWare
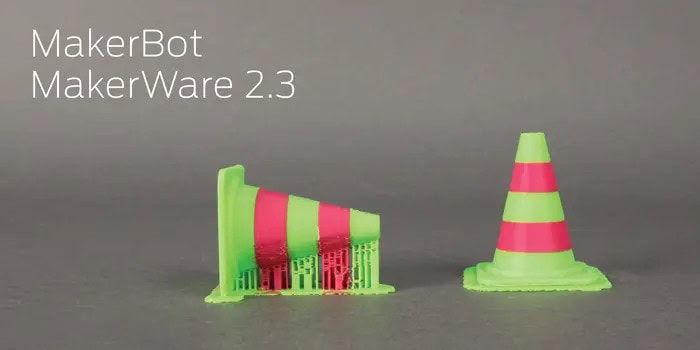
Для отримання більш чистих і рівномірних поверхонь багатоколірних об’єктів принтер MakerBot Replicator 2X отримав можливість друкувати технологічні підкладки та підтримувальні конструкції різними кольорами.
Для підвищення якості об’єктів під час друку застосовується захист екструдера Extrusion Guards. Це ультратонкі бар’єри, які очищають екструдер від зайвого матеріалу, зменшуючи засмічення сопла та підвищуючи продуктивність принтера.
У MakerWare 2.3 з’явилися нові налаштування, які дозволяють використовувати мультиматеріали в обох модифікаціях принтера Replicator.
Для друку зовнішніх частин моделі рекомендується використовувати фірмове еластичне волокно MakerBot® Flexible Filament, а для внутрішніх частин, які видаляються, – матеріал MakerBot® Dissolvable Filament, що легко розчиняється у побутовому розчиннику Лимонен.
Попередній перегляд друку дозволяє відразу побачити результат. Тепер не потрібно чекати завершення друку, щоб дізнатися, як виглядатиме об’єкт. Ви можете заздалегідь побачити, як ваша 3D-модель виглядатиме в різних кольорах, де і як будуть створені підтримувальні структури, переглянути увесь процес друку по шарах тощо.
Функція попереднього розрахунку часу друку та витрати матеріалів дозволить швидко оцінити, скільки знадобиться того й іншого.
MakerWare – це повністю безкоштовне програмне забезпечення. Його можна легко завантажити з офіційного сайту компанії MakerBot.
ПЗ MakerWare – це основне багатофункціональне програмне забезпечення для таких 3D принтерів як: MakerBot, Wanhao, Malyan.
Після завантаження інсталяційних файлів – встановіть програму на комп’ютер. Щоб розпочати друк – використовуйте файли, перенесені з SD-карти. Файли повинні мати формат STL або OBJ.
3D принтер-MakerWare
Розпочнемо роботу з програмою MakerWare:
Запустивши програму, натискаємо кнопку Add. У вікні, що з’явиться, обираємо файл потрібного формату. І ось наша модель на платформі. А тепер розглянемо детальніше значення кнопок у вікні програми:
- Кнопки “+” і “-” у верхньому лівому куті екрана дозволяють наблизити або віддалити об’єкт. Цього ж можна досягти прокручуючи колесо миші.
- Кнопка у вигляді будиночка дозволяє повернути початковий вигляд.
- Кнопка у вигляді стрілки під назвою Look – з її допомогою можна обертати платформу і об’єкт мишею, а також обирати вигляд спереду, зверху або збоку.
- Наступна кнопка – Move. Вибравши її, ви переміщуєте об’єкт по платформі.
- Кнопка Turn – дозволяє обертати об’єкт.
- Кнопка Scale допоможе зменшити або збільшити об’єкт на платформі.
Додаткова перевага MakerWare – можливість працювати з кількома STL-файлами на одній платформі. Це дозволяє економити час при роботі з кількома об’єктами. Щоб додати другий об’єкт – перемістіть вже завантажений на платформі об’єкт кнопкою Move. Потім за допомогою Add завантажте ще один об’єкт потрібного формату. Після того, як ви обрали необхідні моделі, їхні розміри та розташування на платформі – можна переходити до налаштувань друку.
Натискаємо кнопку Make у верхньому меню. У вікні, що відкрилося, обираємо наш принтер і матеріал для друку.
3D принтер-MakerWare
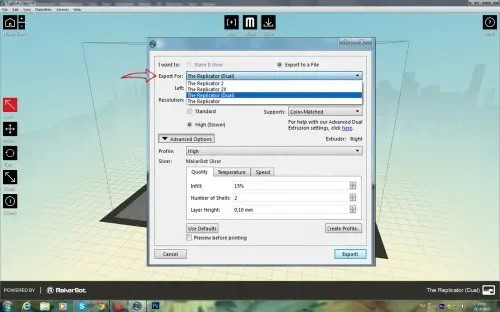
Трохи нижче обираємо параметри якості друку.
Розглянемо детальніше підпункти меню Quality:
Infill – це відсоток заповнення моделі. Збільшення цього параметра допоможе усунути проблему з провисанням “стелі” моделі.
Number of shells – кількість проходів (рядів). Збільшення цього параметра допоможе вирішити проблеми з бічними стінками, якщо вони є.
Layer height – висота шару. Визначає, наскільки щільно екструдер буде накладати кожен наступний шар.
3D принтер-MakerWare
Наступна вкладка – Temperature.
Оберіть температуру екструдера відповідно до температури плавлення обраного матеріалу. Поставивши/знявши галочку, ви можете ввімкнути підігрів платформи.
Далі йде меню Speed.
Speed while extruding – швидкість процесу друку.
Speed while traveling – швидкість переміщення екструдера без друку.
Якщо ваша модель потребує підкладки або підтримок – зверніть увагу на пункти меню Raft і Supports.
Після налаштування моделі для друку – експортуйте файл на SD-карту.
Потім вставте карту у відповідний роз’єм принтера. За допомогою кнопок керування на принтері запустіть друк макета. Залишиться лише дочекатися результату.
Нещодавно програму оновили. Додали дуже зручну функцію: тепер можна розрахувати вагу об’єкта ще до початку друку. Друга опція – час друку. Це дуже зручно, адже можна знати, коли принтер завершить роботу і буде готовий до наступного завдання.
Щоб скористатися новою функцією MakerWare, потрібно поставити галочку після вибору виду пластику та його швидкісних/температурних налаштувань.
Після цього натисніть експорт файлу на SD-карту.
Вікно з даними про вагу та час відкриється автоматично:
З новою опцією розрахунок будь-якого об’єкта не становитиме труднощів.


Залишити коментар