

3D Modeling for Printing from Drawings
In 3D printing, a digital model of the future product is a key element necessary for the process of reproducing the object on a 3D printer. 3D modeling for printing follows specific rules and can be either technical or artistic in nature. Today, we want to talk about artistic, or design-based modeling, as well as 3D printing from a ready-made 3D model using one of our projects as an example.

Our company received a very creative and unusual assignment – 3D modeling of a doll based on the sketch attached above. After completing the model, it needed to be printed on a 3D printer, processed, and painted according to the sketch. Although we more often handle technical projects, this assignment was not a challenge for our specialists. Below, we describe the work process step by step.
Creating a 3D Model from a Sketch
First, let’s outline the sequence of steps required to complete such a task:
- Approval of the assignment;
- 3D modeling for printing;
- Exporting the final file to STL format;
- Generating G-Code;
- Starting the 3D printing process;
- Post-processing and preparing the printed product for painting;
- Painting and, if necessary, applying a protective varnish.
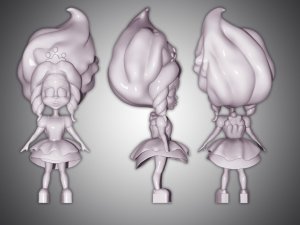
In our case, 3D modeling for printing was done in ZBrush – an optimal program for creating organic elements. You can read more about it in this article. Visualization of the final model (without painting) was also performed in ZBrush. The rendered image is shown above.
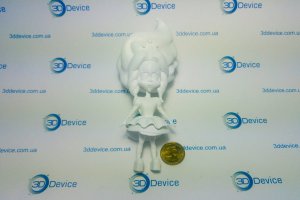
After completing the 3D modeling and approving the final version with the client, the 3D model was ready for printing. PLA 3D plastic was chosen as the material for the doll. This polymer is easy to print and post-process and is widely used for decorative purposes.
Post-Processing After 3D Printing
The printed model required the removal of support structures and smoothing the surface to make painting easier. More details on preparing and painting plastic models can be found in this article.
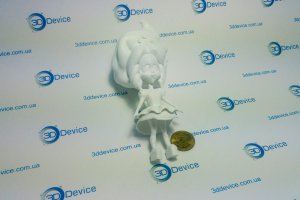
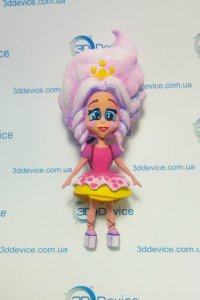
First, all support structures were removed, and all surface irregularities were sanded. Then, multiple layers of acrylic primer were applied to the doll. Painting was done with regular acrylic paints, and no varnish was applied. The result of our work is shown below.
If you are interested in this type of 3D modeling for printing or have your own ideas that you have not yet been able to realize, contact our company! We take on projects of any complexity and are open to new and unusual concepts. Send us your ideas by email, or visit our office after contacting us by phone, listed in the “Contacts” section. We look forward to collaborating with you!


Leave a Comment